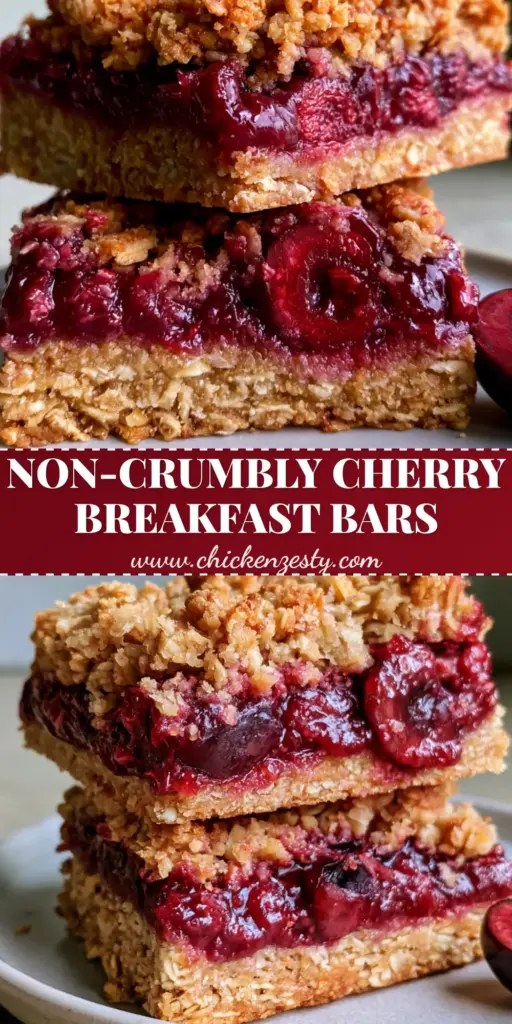
These Cherry Breakfast Bars are the ultimate morning game-changer, combining a firm, pressed toasted oatmeal base with a thick, glistening crimson cherry fruit filling that truly pops. If you are tired of crumbly, messy granola bars that fall apart before the first bite, you have found your new favorite sweet breakfast recipes staple.
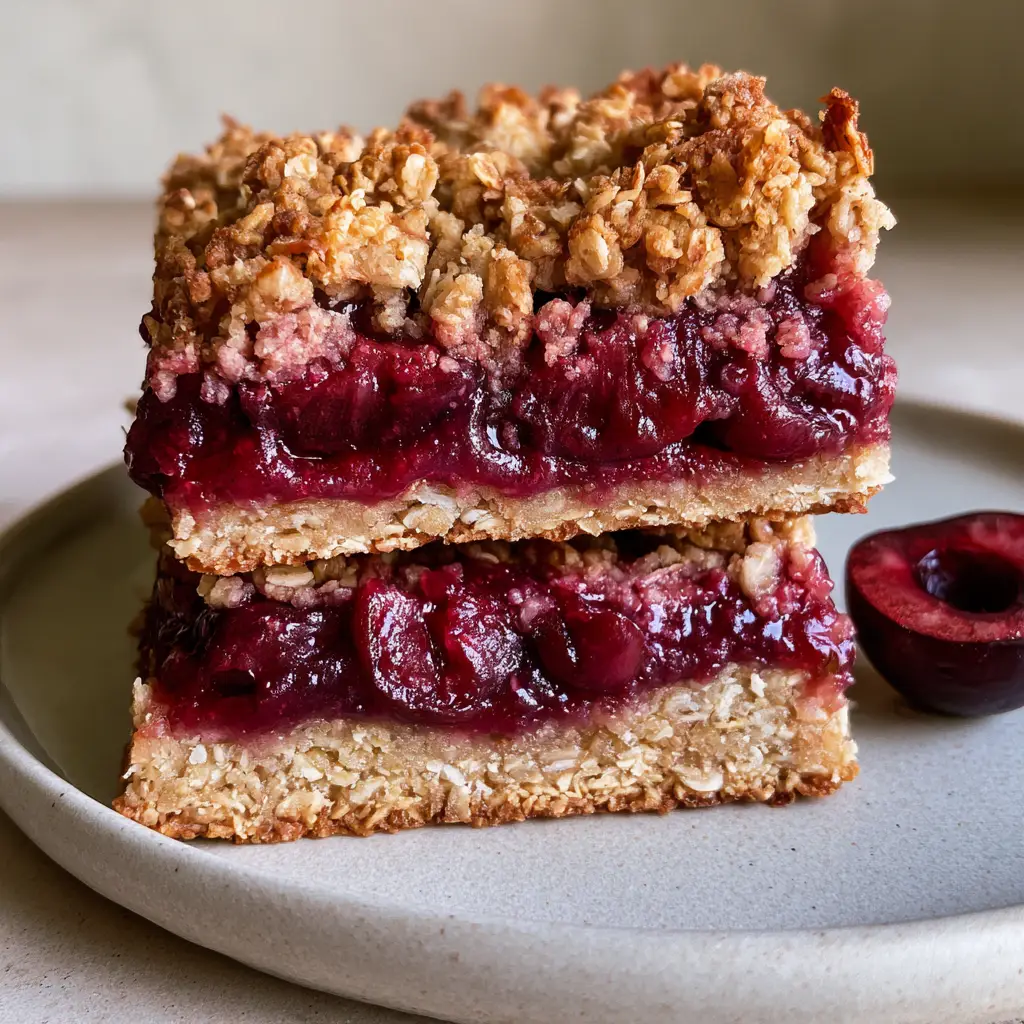
Imagine waking up to the aroma of buttery toasted oats and sweet-tart cherries. These bars feature a rustic, chunky golden-brown oat crumble topping that provides the perfect crunch against the softened whole tart cherries nestled in a deep ruby-red jam. They are designed to be firm and non-crumbly, making them the perfect grab-and-go fuel for busy mornings.
Why You Will Crave These Cherry Breakfast Bars
- Perfectly Portioned: These bars feature clean, sharp edges that make them easy to pack in lunchboxes or grab on your way out the door.
- Textural Harmony: You get a compressed, golden-toasted base, a dense fruit layer, and a chunky crumble top all in one bite.
- Visually Stunning: The deep ruby-red filling against the golden oats looks like it came straight from a professional bakery.
- Meal-Prep Friendly: Make a big batch on Sunday and enjoy fresh-tasting Cherry Breakfast Bars all week long.
If you love these fruit-forward treats, you should also check out our caramel crush bars for a decadent afternoon snack or these pumpkin chocolate chip cookies for more cozy baking inspiration.
Essential Ingredients for the Ultimate Fruit Bars
To achieve the professional results shown in our visual blueprint, each ingredient serves a specific culinary purpose. We focus on high-quality pantry staples to ensure the best flavor and texture.
The Golden Oat Crust and Crumble
- Old-Fashioned Rolled Oats: 2 cups (180g). These provide the essential structure and a hearty, toasted flavor. Avoid instant oats, as they won’t provide the same “chunky” texture.
- Almond Flour: 1 cup (96g). This is the secret to a firm, non-crumbly base. It adds a subtle nuttiness and acts as a binder.
- Unsalted Butter: 3/4 cup (170g), melted. This coats the oats and flour, ensuring a golden-brown finish and a rich, buttery mouthfeel.
- Brown Sugar: 1/2 cup (100g), packed. The molasses in the brown sugar helps the base caramelize and hold its shape.
- Sea Salt: 1/2 tsp (3g). A crucial “invisible” ingredient that balances the sweetness of the cherries.
The Crimson Cherry Filling
- Tart Cherries: 3 cups (approx. 450g), pitted. You can use fresh or frozen. These will soften beautifully while maintaining their shape as softened whole tart cherries.
- Granulated Sugar: 1/3 cup (65g). This draws the moisture out of the fruit to create that dense, glistening jam layer.
- Lemon Juice: 1 tbsp (15ml). The acidity brightens the deep ruby-red color and balances the natural sugars.
- Cornstarch: 2 tbsp (16g). Essential for thickening the filling so the bars don’t become soggy or fall apart.
How to Make Cherry Breakfast Bars Step-by-Step
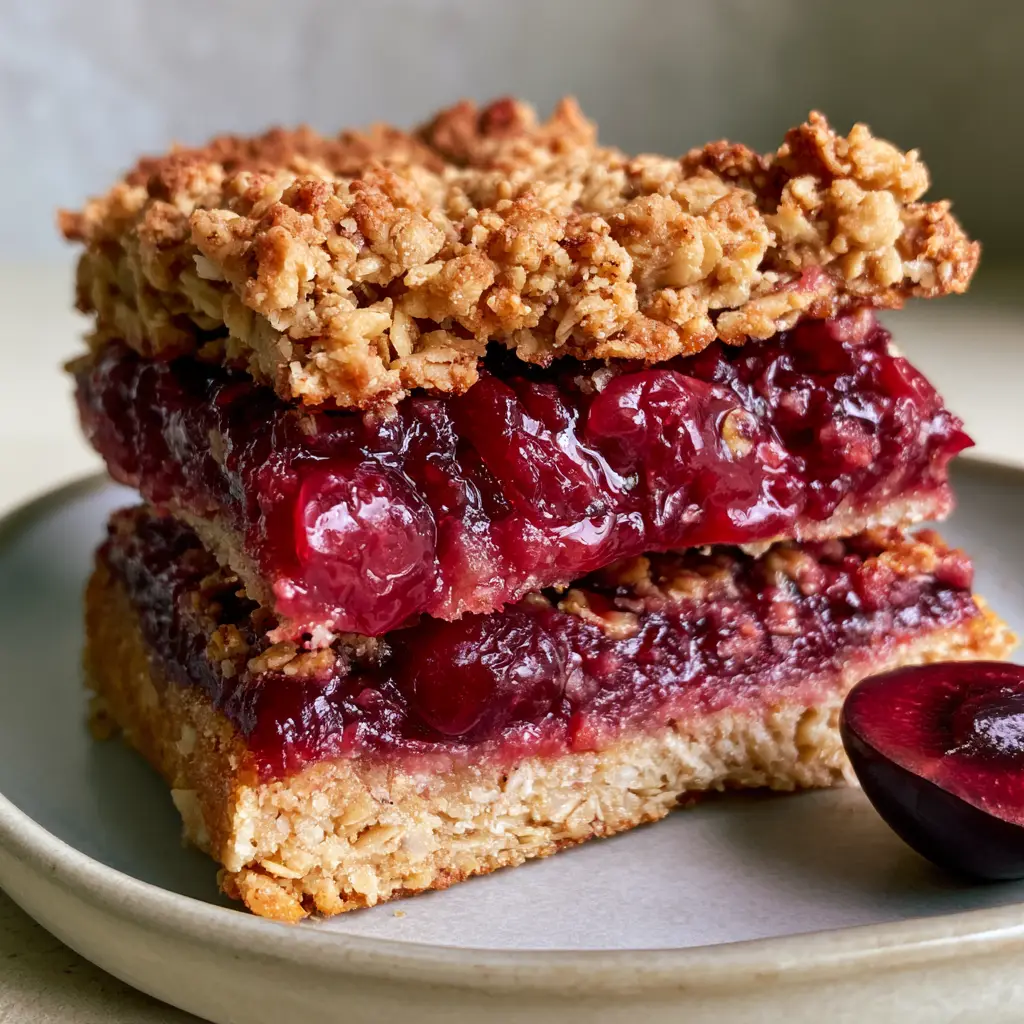
Following these steps ensures your Cherry Breakfast Bars look exactly like the professional macro shots. We are aiming for a side-profile that shows three distinct, beautiful layers.
Step 1: Prep and Toast the Base
Preheat your oven to 350°F (175°C). Line an 8×8 inch (20x20cm) square baking pan with parchment paper, leaving an overhang on the sides for easy removal.
In a large mixing bowl, combine the rolled oats, almond flour, brown sugar, and salt. Pour in the melted butter and stir until the mixture resembles wet sand. The smell of the butter hitting the oats is your first sensory cue that you are on the right track!
Reserve 1 cup (approx. 150g) of this mixture for the topping. Press the remaining mixture firmly into the bottom of the prepared pan. Pro Tip: Use the bottom of a flat measuring cup to press down hard. This creates the “thick, compressed base” needed for clean edges.
Step 2: Simmer the Deep Ruby-Red Filling
While the base pre-bakes for 10 minutes, prepare the filling. In a medium saucepan, combine the cherries, sugar, and lemon juice. Simmer over medium heat for 5-7 minutes.
You will see the cherries begin to release their juices, creating a bright red syrup. In a small bowl, whisk the cornstarch with a tablespoon of water to create a slurry. Stir this into the simmering cherries.
Continue to cook for another 2 minutes until the liquid transforms into a dense, glistening jam. You should still see visible pieces of softened whole tart cherries—this provides the high-end visual appeal Pinterest users love.
Step 3: Assemble the Layers
Spread the cherry filling evenly over the pre-baked oat base. The contrast between the golden oats and the crimson fruit is exactly what makes these Cherry Breakfast Bars so irresistible.
Take the reserved oat mixture and sprinkle it over the top. Use your fingers to squeeze small handfuls together to create a “rustic, chunky golden-brown oat crumble.” Do not press this layer down; let it sit loosely for maximum texture.
Step 4: The Final Bake
Bake for another 25-30 minutes. You are looking for the edges to be bubbling and the crumble topping to reach a deep, golden hue. The kitchen should smell like a toasted cherry pie.
If you are planning a brunch spread, these bars pair beautifully with our banana cottage cheese waffles for a high-protein start to the day.
Expert Tips for Success
- The Cooling Rule: You must let these bars cool completely in the pan before cutting. For the sharpest, cleanest edges, chill the pan in the refrigerator for 2 hours before slicing.
- Fresh Garnish: Just before serving, top with a fresh halved dark cherry with glossy skin. This adds a pop of freshness and mimics the professional styling of our visual blueprint.
- Soggy Bottom Prevention: Pre-baking the base is non-negotiable. It creates a barrier that keeps the oat foundation crisp even under the dense fruit layer.
- Neutral Plating: To make the colors pop for your own photos, serve on a neutral ceramic plate, just like in our Midjourney inspiration.
Storage, Reheating & Freezing
Proper storage ensures your Cherry Breakfast Bars stay firm and delicious for days. Store them in an airtight container at room temperature for up to 2 days, or in the refrigerator for up to 7 days.
If you want to freeze them, wrap individual bars in plastic wrap and store them in a freezer-safe bag for up to 3 months. To reheat, simply pop them in a toaster oven at 300°F (150°C) for 5 minutes to restore the crunch of the oat crumble.
What to Serve With This
These bars are incredibly versatile. For a light breakfast, serve one alongside a bowl of Greek yogurt. If you are hosting a brunch, they act as a fantastic sweet contrast to savory dishes like our honey garlic ground beef bowl (if you’re doing a fusion brunch!) or a classic egg scramble.
Frequently Asked Questions
As long as you use certified gluten-free rolled oats, this recipe is naturally gluten-free thanks to the use of almond flour instead of wheat flour.
You can use all-purpose flour in a 1:1 ratio if you don’t have almond flour, though the bars will have a slightly less nutty flavor and different crumb structure.
Yes! Frozen cherries work perfectly. You do not need to thaw them first; just simmer them slightly longer in the saucepan until they release their juices and thicken with the cornstarch.
The secret is cooling. Let the bars reach room temperature, then refrigerate them for at least 2 hours. Use a sharp chef’s knife and wipe the blade clean between every cut.
Sogginess usually happens if the filling isn’t thickened enough or if the base wasn’t pre-baked. Ensure your cherry jam is dense and glistening before adding it to the pre-baked crust.
The Ultimate Cherry Breakfast Bars Recipe
Cherry Breakfast Bars: The Best Easy Make-Ahead Morning Treat
Ingredients
Equipment
Method
- Combine oats, almond flour, brown sugar, and salt. Stir in melted butter until mixture looks like wet sand.
- Reserve 1 cup of mixture. Press the rest firmly into a lined 8x8 pan. Pre-bake at 350°F (175°C) for 10 minutes.
- In a saucepan, simmer cherries, sugar, and lemon juice for 5-7 minutes until cherries soften.
- Whisk cornstarch with 1 tbsp water and stir into cherries. Cook 2 more minutes until thick and glistening.
- Spread cherry jam over pre-baked crust. Sprinkle with reserved crumble mixture.
- Bake for 25-30 minutes until golden-brown and bubbling.
Notes
Garnish with a fresh halved cherry for a professional look.
Save, Rate, and Share!
Did these Cherry Breakfast Bars become your new morning obsession? We want to see your results! Save this recipe to your “Breakfast Ideas” board on Pinterest so you never lose it. Follow savory_vale for more high-performing, delicious recipes every week.
Please leave a 5-star rating in the recipe card above and snap a photo of your bars—tag us or share it in the comments below! Your feedback helps our community of home cooks thrive.